
Professional Game Review
(Weiqi/Go/Baduk)
27th LG Cup Final Game 2
Black: Ding Hao
White: Yang Ding Xin
Komi: + 6.5
Place: Beijing, China
Date:2023-Feb-1
Phase 1 Move 1-34
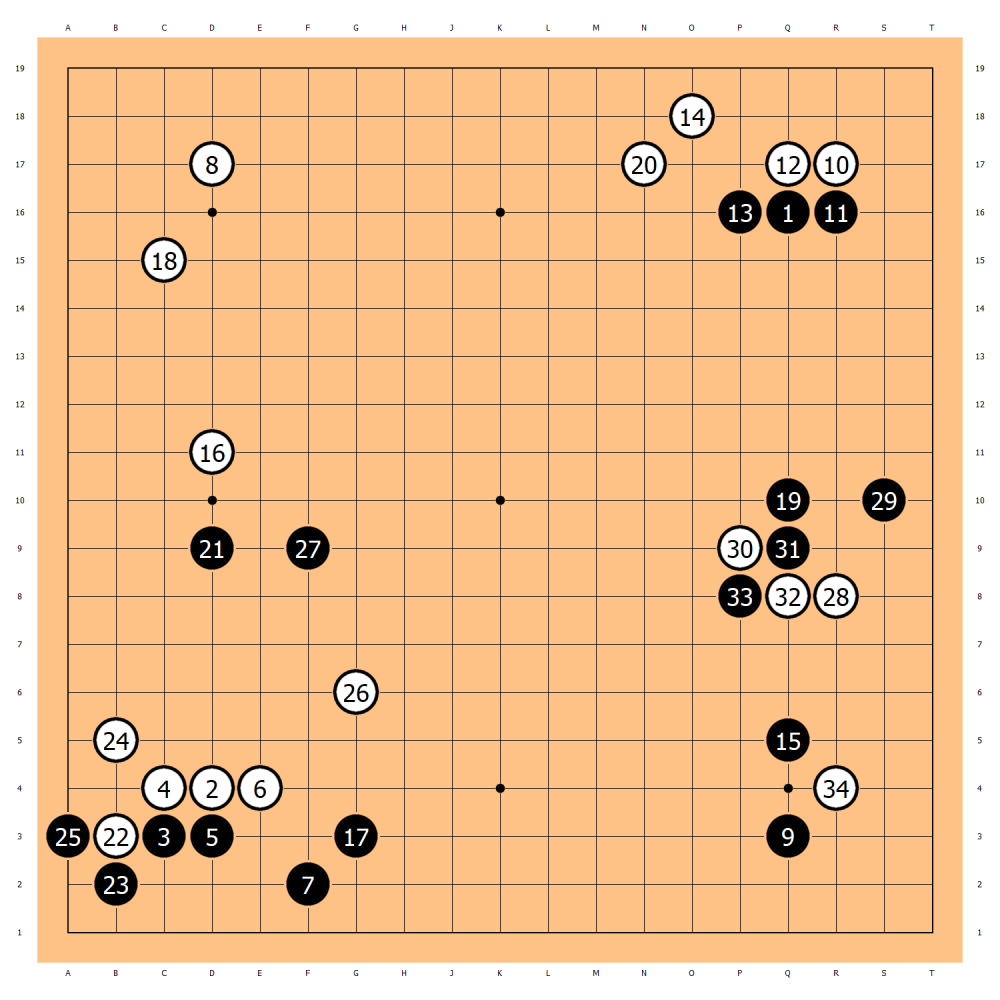
On February 1st at 9 AM, the second game of the finals began. After Ding Hao placed his first stone on the star point, White responded by occupying the diagonal star point. Black’s third move to invade the corner was decisive.
White countered by invading the upper right corner with move 10, leading to a symmetric outline by move 14. Black’s move 15 to protect the corner was part of Ding Hao’s studied strategy.
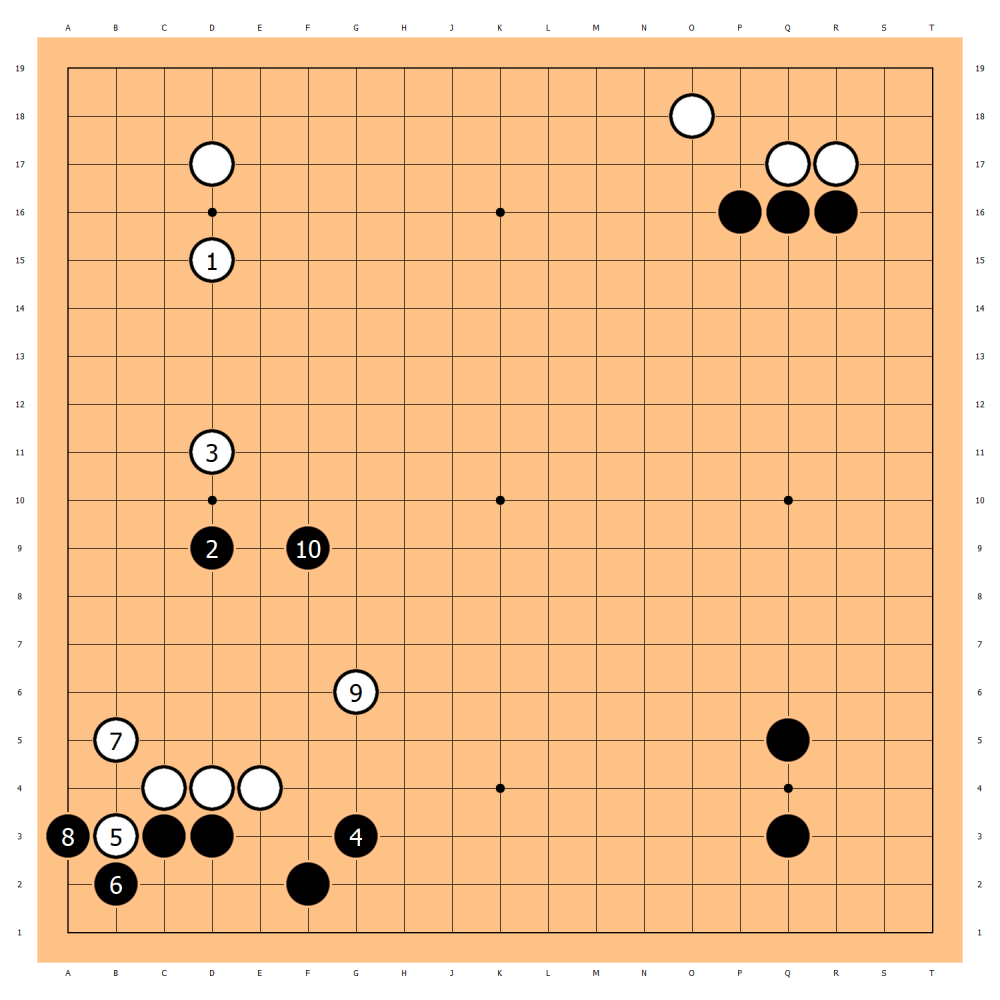
Diagram 1
In Diagram 1, If White mirrors Black by protecting the corner with move 1, Black’s move 2 aims to attack White’s three stones, creating a two-part position.

Diagram 2
In Diagram 2, Fujisawa Hosai, a contemporary of Go Seigen and Sakata Eio, was known for his skill in horizontal mirror go and had many games with over seventy moves in the “Zenjiro style” mirror go. However, Ding Hao was not worried about White continuing to mirror Black, as Black, with the advantage of the first move, could always use the special nature of the central point to break the mirroring.
White’s moves 16 and 18, which were high extensions followed by a corner defense, were rare. Yang Dingxin’s aim was to avoid Black’s researched strategies and steer the game into unfamiliar territory. By White’s move 20, except for the slight differences between Black 15 and White 18, and White 16 and Black 19, the game took on a “quasi-mirror” confrontation.
However, White’s calm move 20 led to a decrease in their win rate.

Diagram 3
In Diagram 3, the left side of the board shows a white formation that is too widely spaced. White reinforces with move 1, creating a mutual surrounding pattern, resulting in a roughly equal win rate for both sides.
Yang Dingxin, undeterred by minor fluctuations in win rate, remained committed to his strategy of seizing the initiative later. Black 21 made the first aggressive invasion, leading to a formation both players had anticipated by move 26. When White 28 invaded Black’s territory, it resulted in a mutual breaking pattern, distinctly different from the previous diagram.
White’s move 30 pressed down, and Black responded with moves 31 and 33, cutting powerfully!

Diagram 4
In Diagram 4, Black could have followed up by enclosing territory, which was a viable option. However, this was not Ding Hao’s preferred strategy. He had great confidence in his fighting strength and was unafraid of any challenge. His pre-game strategy was to overpower his opponent through combat, never backing down easily when facing a direct clash.
White’s move 34 to turn the corner reflected Yang Dingxin’s “non-confrontational” playing style.

Diagram 5
In Diagram 5, White 1 attaches, following a standard pattern, allowing White to comfortably emerge from the lower side. At this point, Ding Hao had not fully considered how the game would proceed, but White soon played the move to invade at the 3-3 point with move 34. Yang Dingxin’s evasive maneuver was somewhat unexpected for Ding Hao, who keenly sensed a shift in his opponent’s mindset.
In the LG Cup, each player has a time limit of three hours. Up to this stage in the game, Black had used 24 minutes, while White had used 42 minutes, giving Ding Hao a slight advantage in terms of time.
Phase 2 Move 35-77
In the lower right, White maneuvers and evades, attempting to transition into the corner. Black 35 forcefully blocks, playing exceptionally strong and unyielding moves.
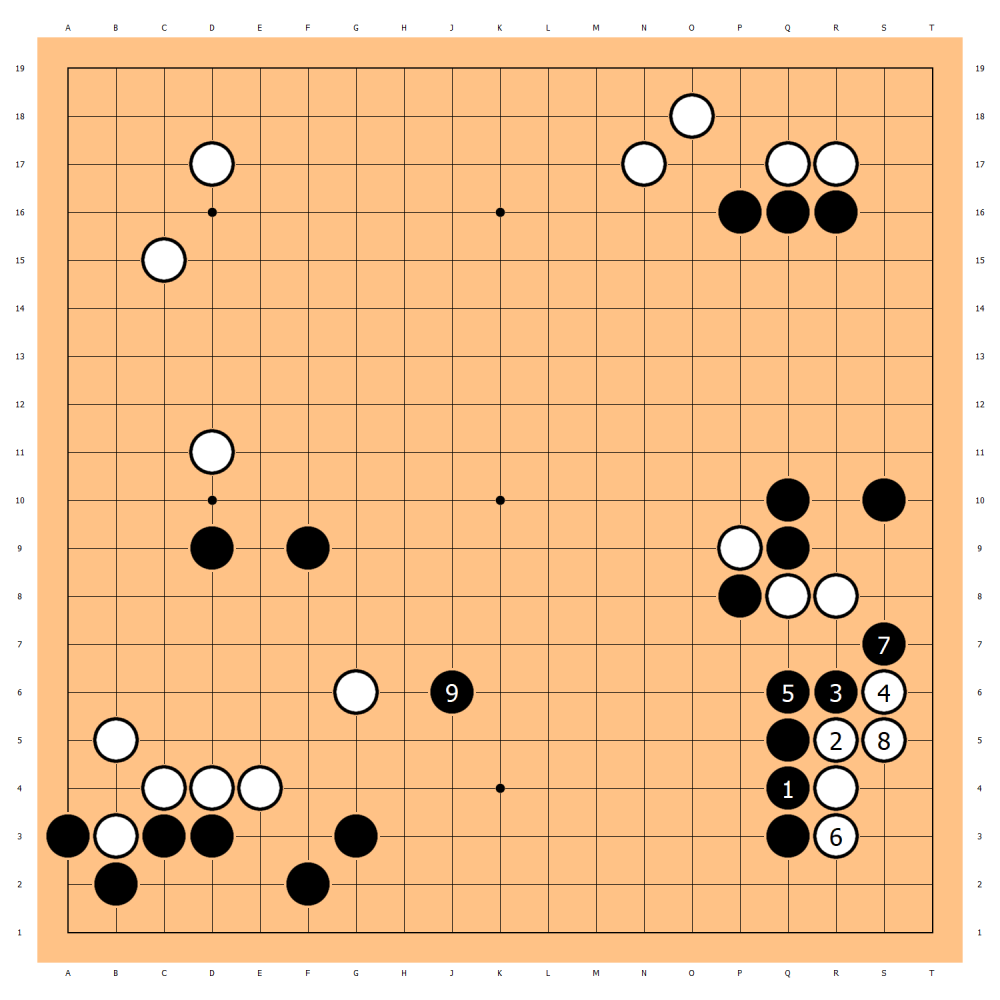
Diagram 6
In Diagram 6, Black 1’s solid extension is relatively straightforward, allowing White to secure a living corner as the second player. Black’s potential in the lower right appears quite expansive. Ding Hao doesn’t seem displeased with this variation but maintains a strong fighting spirit, hoping to block in the actual game to gain greater benefits.
Subsequently, White 40 pivots and 42 severs to move strategically, aiming to reshape by exploiting weaknesses in Black’s influence on the left and right sides.
Black’s 43 retreat is inevitable, and while White 44 seems reasonable to human eyes, AI’s move would be more ambitious.
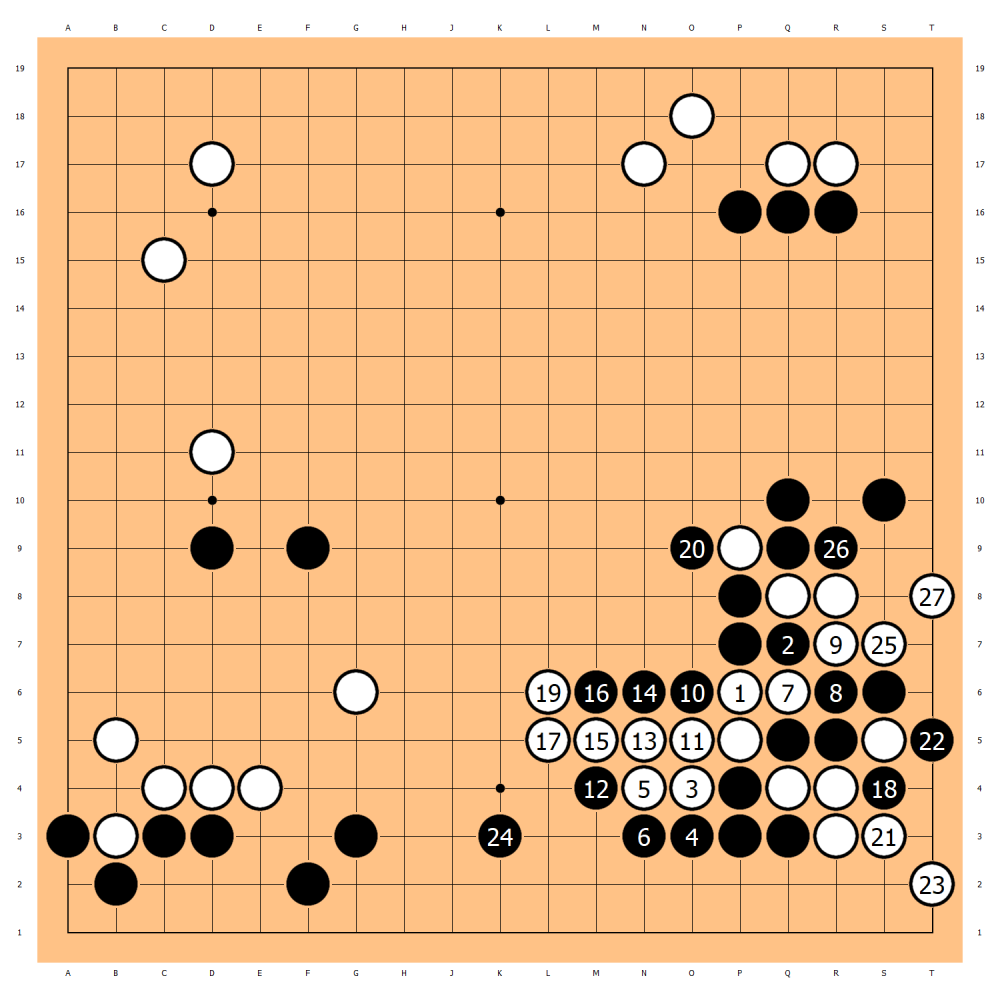
Diagram 7
In Diagram 7, White 1 presses, denying Black the chance to pivot. Following up with 3 and 5 to extend liberties, White forcefully cuts despite being short on liberties and congested. Black, lacking a solid counter, can only extend liberties through captures before connecting a stone.
During this sequence, White’s 23 and 27 diagonal moves demonstrate considerable resilience, making White’s position still tenable. This diagram shows that AI not only overwhelms humans in overall strategy but also unleashes formidable power in direct combat that humans can’t match.
With White 44 connecting, the position simplifies. Black 45 bends, maintaining a hardline approach, forcing White 46 to extend and continue the fight.
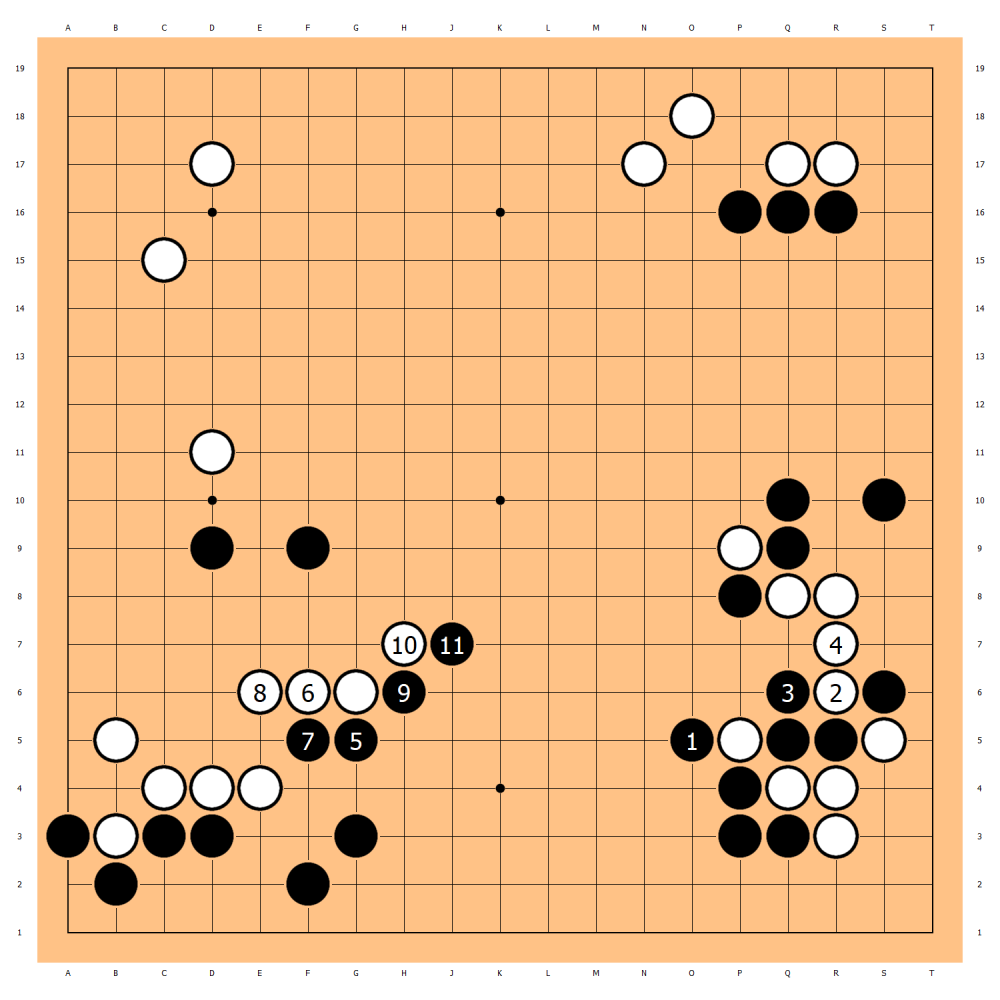
Diagram 8
In Diagram 8, Black 1 captures, avoiding direct conflict, and lets White connect and live, aiming to seize the initiative on the left side, still retaining a clear advantage. Ding Hao’s predetermined strategy for this game was to engage in battles with his opponent, seeking to prove superiority in local skirmishes, hence his consistent disregard for such passive moves. However, Black 45 bending out to fight is also a viable AI choice.
Yang Dingxin, though strong, is not fond of battles. In the ensuing fight, White 48 was a problematic move, causing White’s already unfavorable win rate to drop further. The purpose of this move is somewhat unclear because Black can simply respond with moves like 49. With Black having a forcing move at A on the right side, White lacks a substantial threat against Black, worsening White’s overall position.
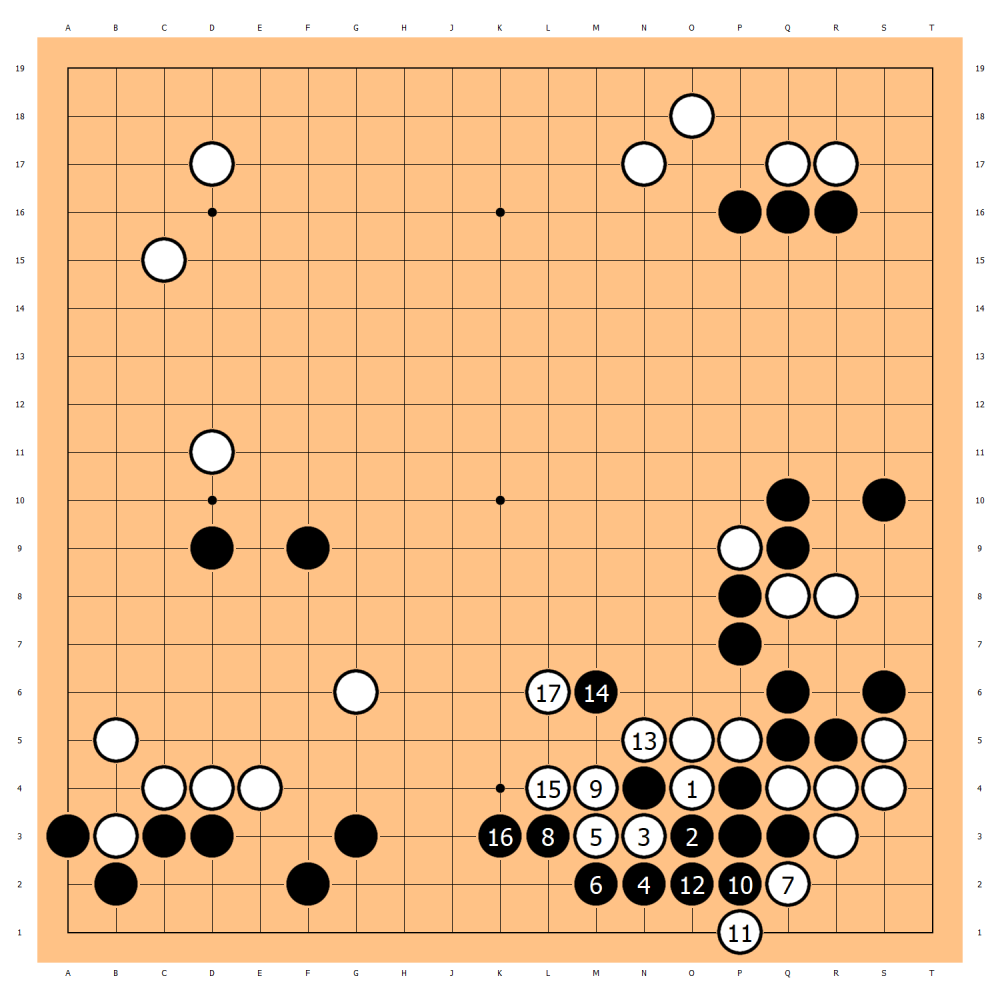
Diagram 9
In Diagram 9, White 1 cuts, and up to White 13 capturing is a feasible strategy, giving White a 35% win rate. The game is still long and full of possibilities.
White 58 is a solid pressing move, to which Black 59 responds with a move to extend liberties.
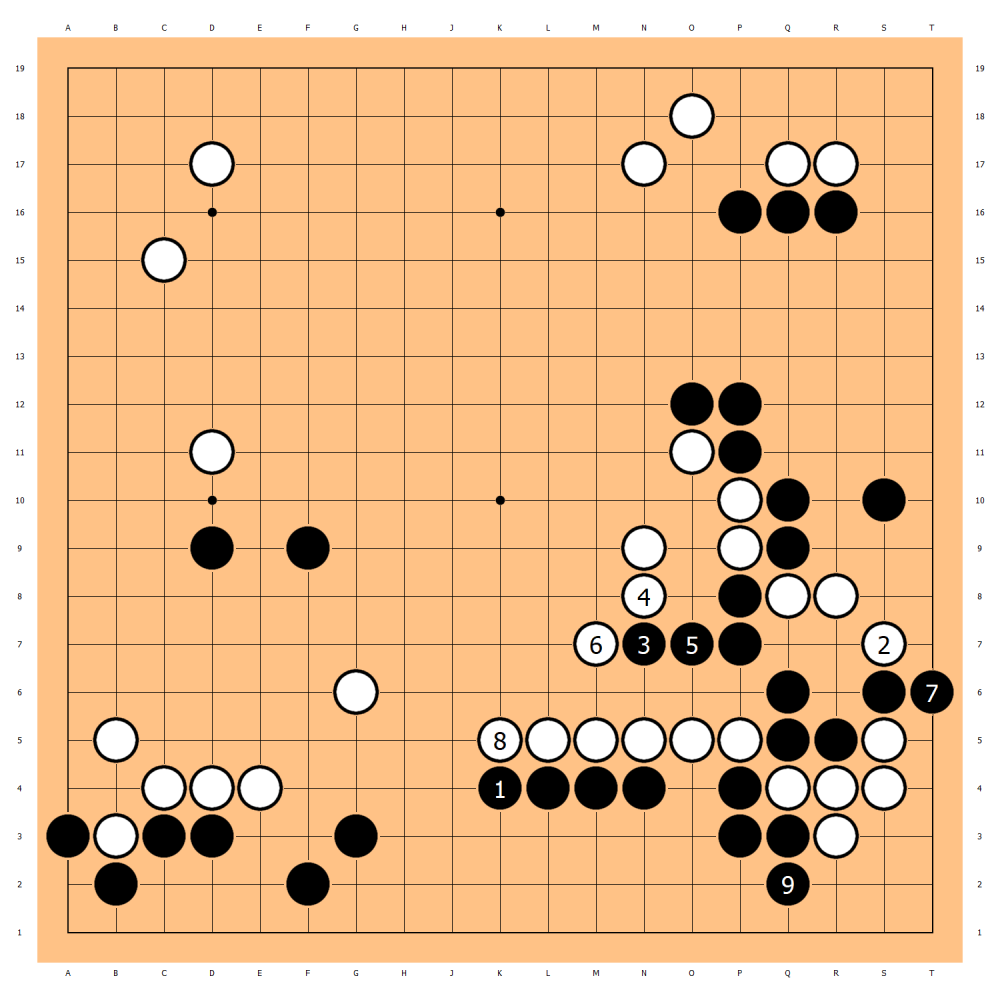
Diagram 10
Diagram 10 shows that the AI suggests Black 1 should extend to secure the territory below and make it safe. After White 2’s small knight’s move, Black can’t make a headway. However, the black stones have a relatively long string, so the tactic of White playing at position A to create a ko threat doesn’t hold. In this diagram, the winning rate for Black is 69%, which is better than the actual game.
White 64’s move of pressing down at the head of the two stones is quite pleasing, and Black 65’s move of capturing and threatening the safety of the white corner is what Ding Hao expected.
At White 68’s small knight’s move, although there is a defect in the black stones here, the timing for the white stones to make a move immediately is questionable. After the exchange of White 68 and Black 69 (capturing the three stones), the corner of the white stones hasn’t been completely alive yet, and the outside also urgently needs to be strengthened. Up to this point, the winning rate of the black stones soars to around 80%.
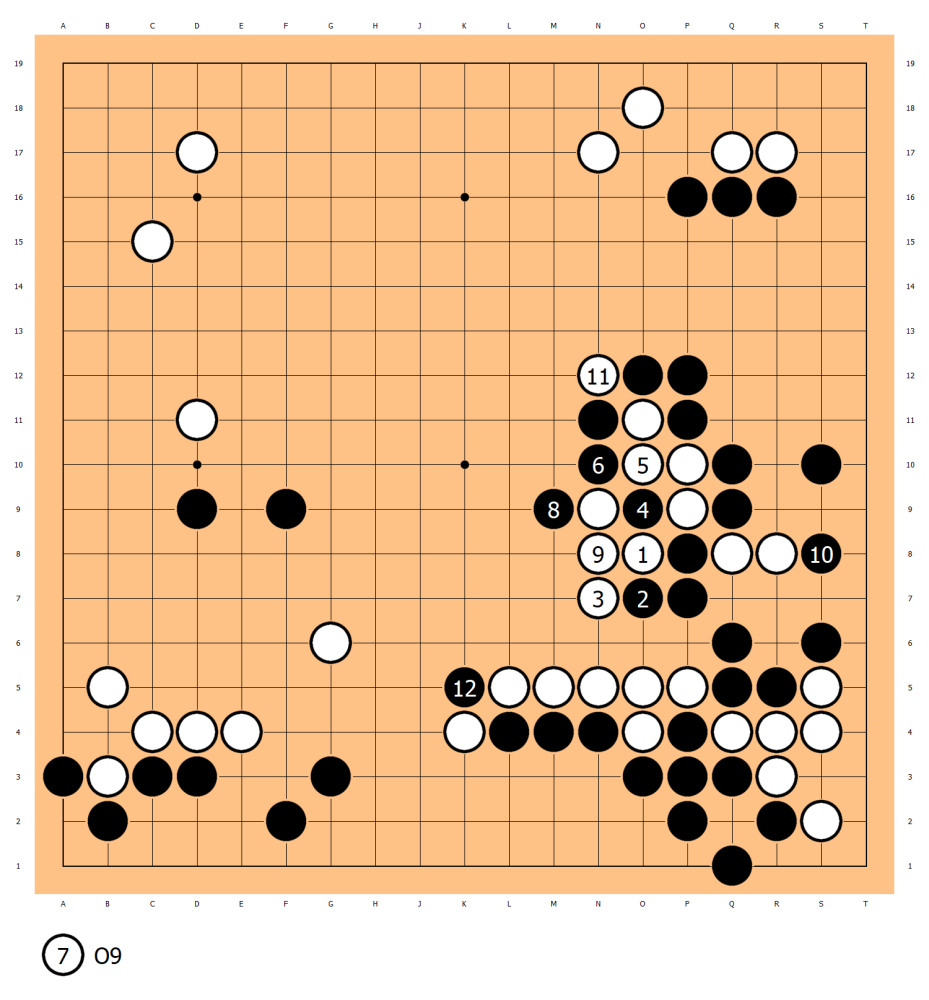
Diagram 11
Based on Diagram 11, the white stones settle the three outer ones and then try to make the corner alive. Next, at White 11 and Black 12, they mutually cut each other. The white stones are still in difficulty. However, compared to the actual game, this diagram is acceptable for the white stones. In the actual game, after the exchange of White 68’s move at the second line and Black 69’s capture, and then reinforcing the outside, no matter how you look at it, it’s a significant mistake.
White 70’s move is the key point for the shape, but Black 71 is not good.
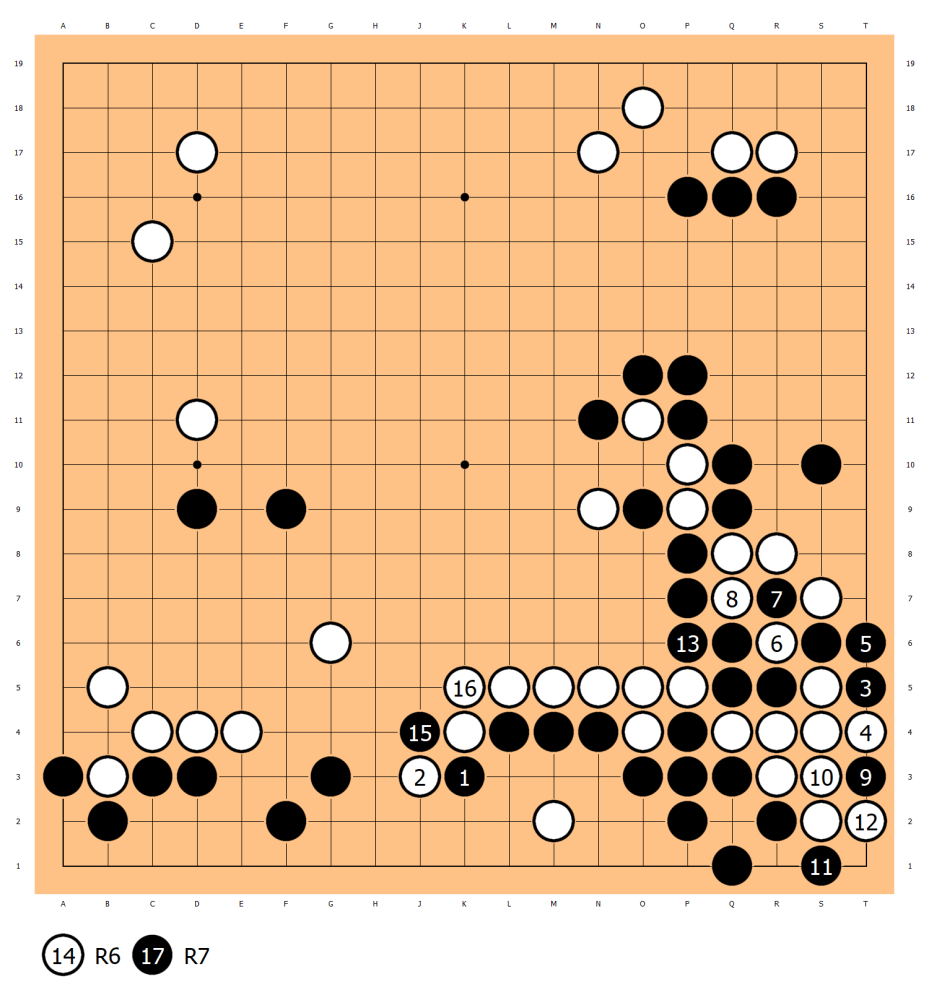
Diagram 12
In Diagram 12, Black 1’s hane seemingly sets the tone for White 2’s double hane, but secretly creates ko threats. Then, at position 3, it unexpectedly strongly kills the white corner. One ko threat is sufficient.
In the actual game, after White makes a breakthrough with the prior move and efficiently connects at 76, the winning rate of the black stones drops from 88% in the previous diagram to 68%. However, with Black 77’s descent, in the lower right, the white stones can only reluctantly start a ko fight and still struggle hard.
Phase 3 Move 78-114
White 78’s throw-in is inevitable. When White plays at 80 and Black adheres to the ko, Black could kill the white stones cleanly. But Ding Hao, playing as Black 81, insists on creating a ko.
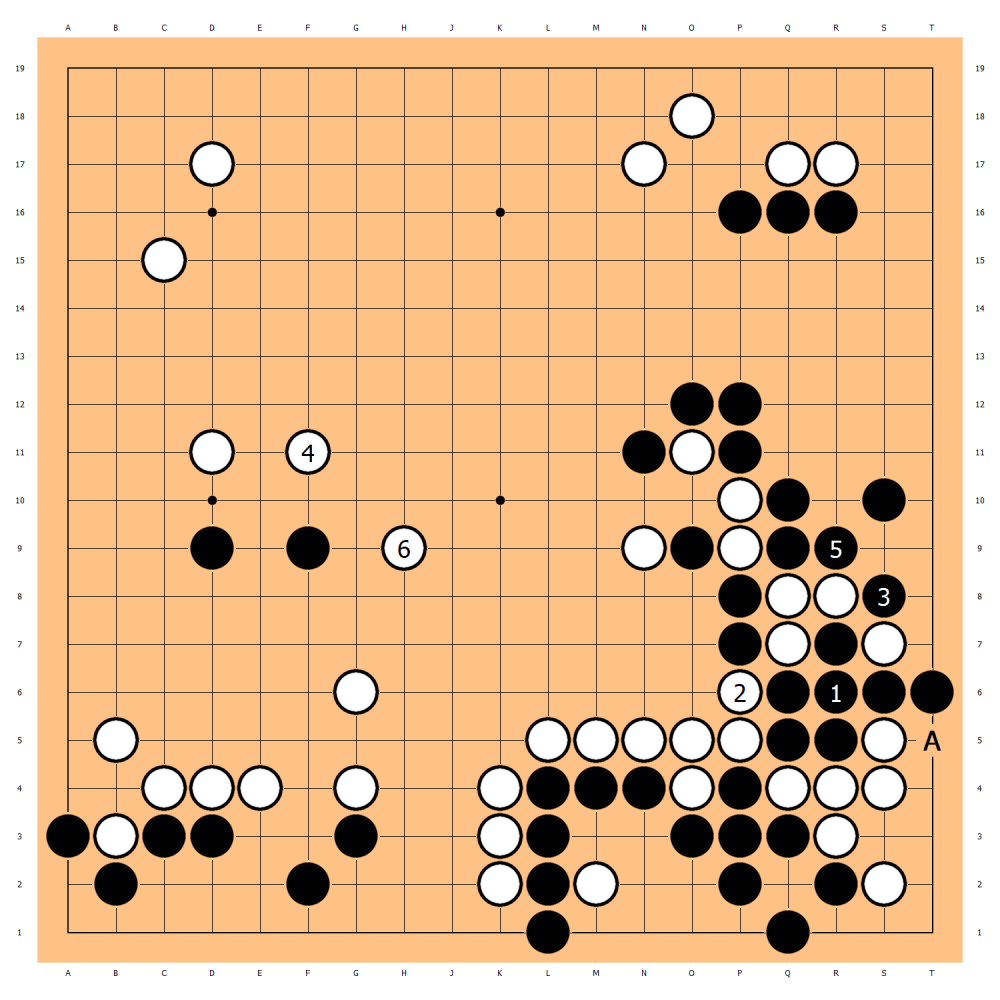
Diagram 13
Diagram 13: Black 1 adheres to the ko. The white stones are killed due to insufficient liberties. However, if the white stones obtain the sente at position A, they will have the opportunity to make a 5-point alive corner. Moreover, they can temporarily leave it and seize the key points for attack and defense on the left. In this diagram, the winning rate of the black stones still holds the advantage but is not as subtle as the actual game.
In the actual game, Black 81 leaves a ko. The white stones have a hard time dealing with it. The entire corner is still under the threat of the black stones. The winning rates of the black stones in the actual game and the previous diagram are 80% and 74% respectively. This is mainly reflected in the restraint effect on the white stones in the subsequent battle. As a top player, Ding Hao naturally understands the mystery. Readers need to slowly comprehend it.
After White 82 initiates the ko, if the black stones seek ko threats as follows.
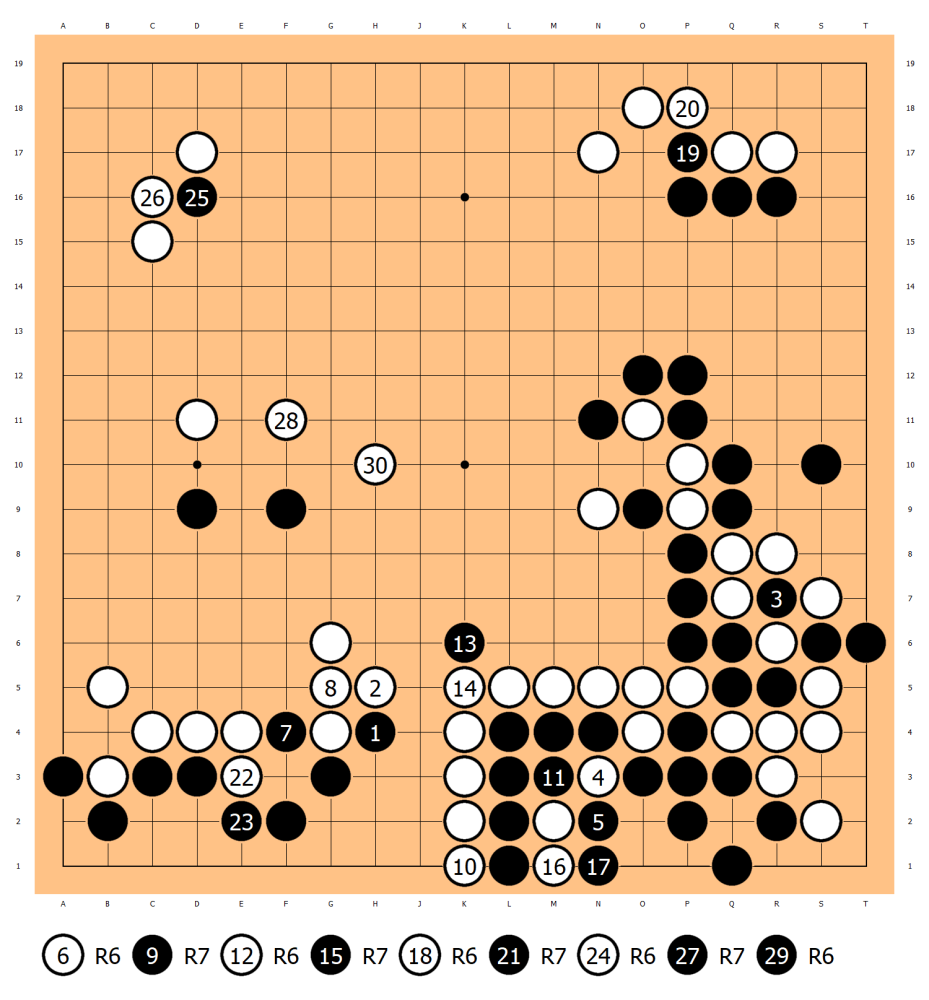
Diagram 14
In Diagram 14, Black 1’s hane shows the obsession with winning the ko. Due to the white stones’ insufficient ko threats, it will eventually jump at 28 and fly at 30 to attack the two stones. After the black stones win the ko, they will have about 75 points of territory on the right half and it’s not difficult to handle the left side. The winning rate of the black stones in this diagram reaches 80%.
In the actual game, Black 83’s move at the safe corner to play the “territory card”, the winning rate drops by 7-8 points compared to the previous diagram. Language judgment doesn’t have to be stubborn about winning the ko. Even if the white stones play first, it seems difficult to handle.
White 6’s block at the corner is unexpected. Yang Piao Xin’s playing style is known for patience and thickness, but such weakness still surprises Ding Hao. The white stones haven’t won the ko and life and death are still hanging in the balance. The AI instantly lowers the winning rate of the white stones from 25% to single digits, emphasizing that the white stones should still create the ko as in the previous diagram and return to the pattern of strongly killing the two stones on the left.
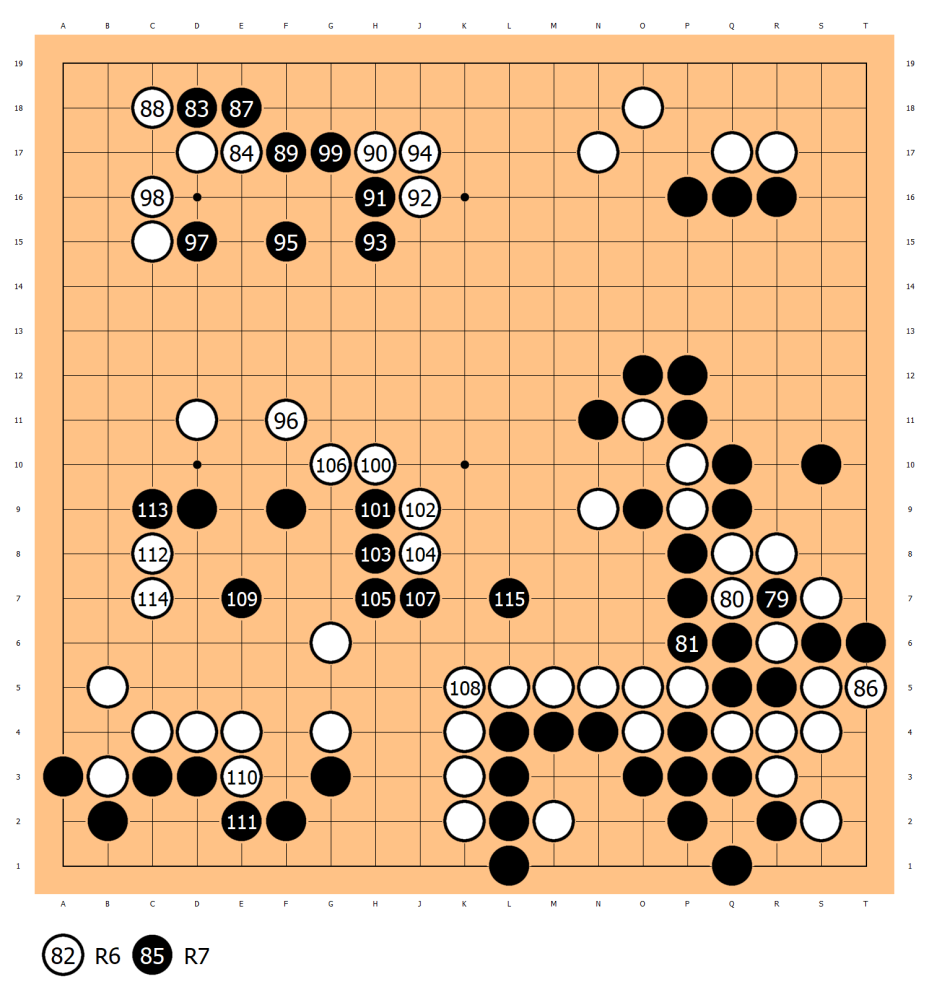
Black 87’s crawl is the continuation of seeking ko threats at 83. The black stones smoothly take territory, but it will inevitably lead to the white stones’ desperate pursuit of the two stones on the left.
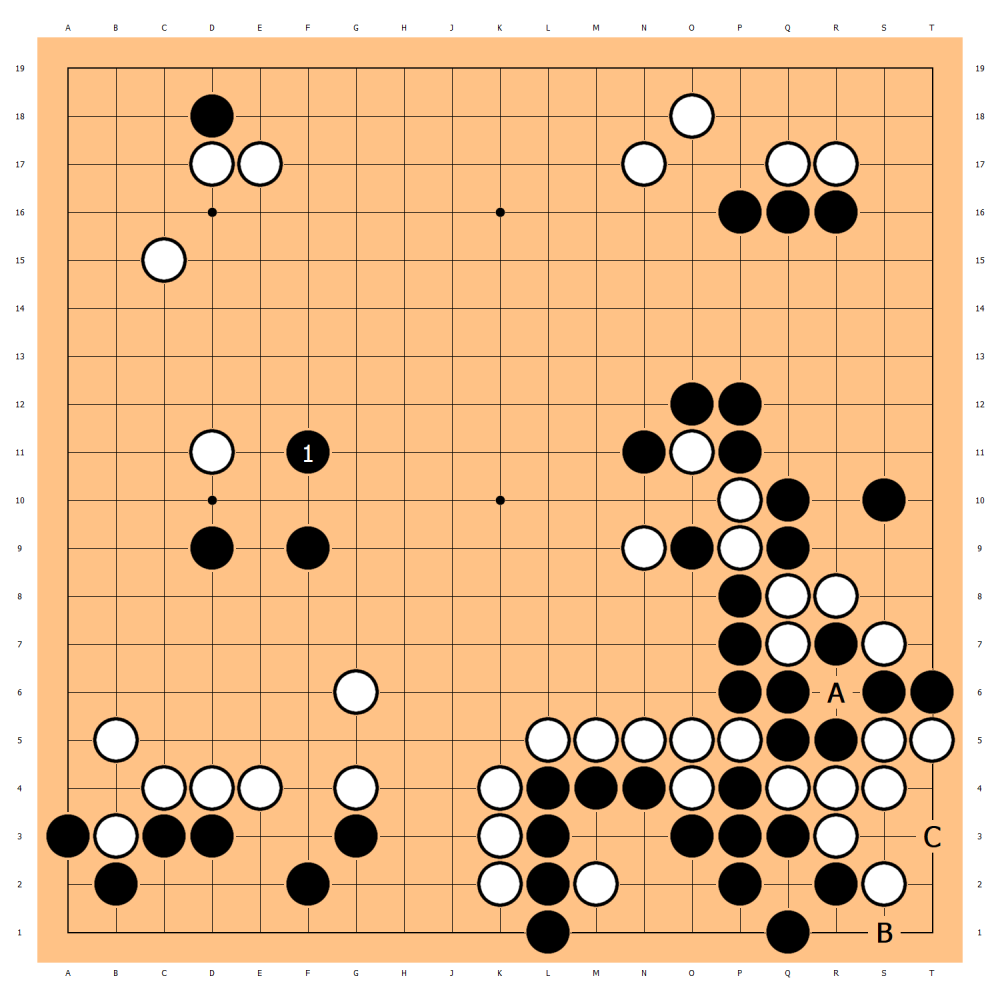
Diagram 15
In Diagram 15, Black 1’s capping play to smooth the left side is a moderate idea. Depending on the development of the situation later, handle the ko fight on the right side: practically make the A, B exchange or kill the entire white stones at position C. In conclusion, now the black stones have a significant advantage and it seems that no matter how they play, it will be a calm game.Black 95 settles locally. The gap in actual territory for the white stones is getting larger.White 96 and 100 can only spare no effort to strongly kill.
At this point, both sides have 1 hour and 12 minutes remaining. Ding Hao judges that as long as the two stones on the left can survive safely, he will have the winning ticket in hand. However, he also has the fleeting thought of sacrificing the stones. This indecisive mindset instead becomes a kind of “indecision”, laying the groundwork for later changes.
White 104’s pressure continues the strong killing. White 106 extends, Black 107 bends, and White 108 connects. Ding Hao suddenly realizes that making a living on the left side is not easy and keeps thinking for a long time. The black stones have insufficient eye space within the white stones’ influence area and need to make a living by exploiting the weaknesses of the white stones. However, it’s quite difficult to decide where to start, thus consuming a lot of time.
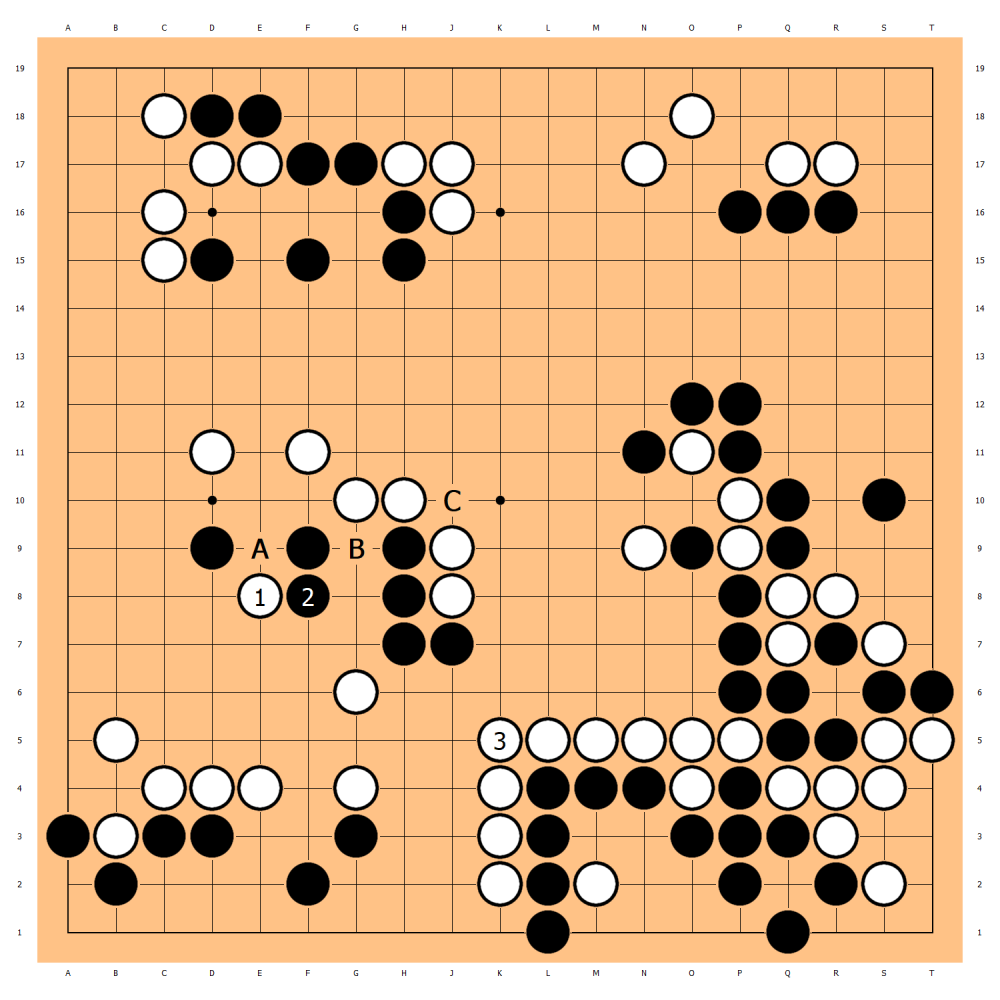
Diagram 16
In Diagram 16, White 1’s peep has unclear advantages and disadvantages. If Black 2 connects at position A, it will be cut by White at position B. Black 2 might instead cut at position C and turn around.
Black 109’s knight’s move is like a lone bird in the forest, attempting to create eye space among the white stones’ solid wall. Yang Dingxin thinks for a long time. White 112 pierces into the heart of the black stones like a sharp blade.
White 114’s horizontal stretch surprises Ding Hao. Its threat is significantly weakened and the black stones’ eye space becomes sufficient instantly.
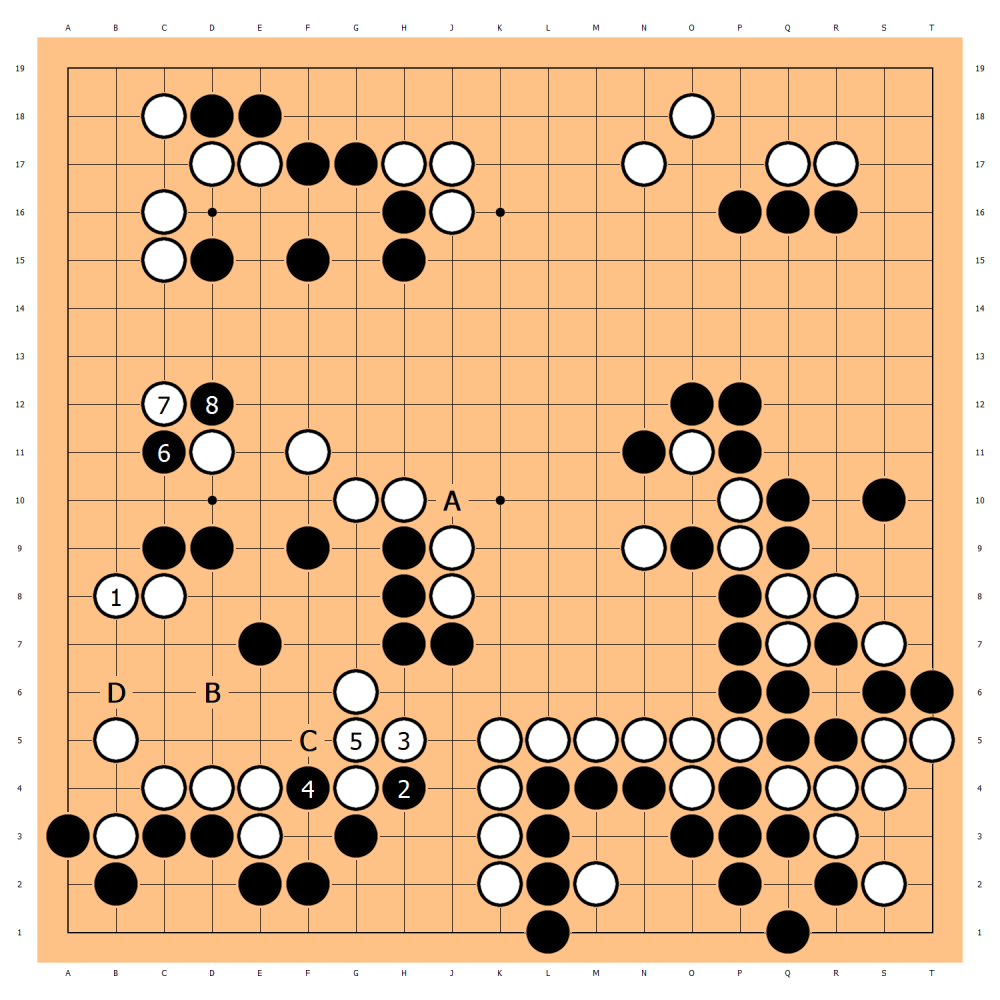
Diagram 17
In Diagram 17, White 1 naturally stands. The black stones cut to manage the isolated group on the third line. Judging from the 75% winning rate, it looks considerable. In fact, finding a way to survive in the narrow space is by no means easy. The AI suggests that Black 6 should cut at position A and look for the entry point from the center. Maybe White has more choices. Yang Dingxin is wary of the sequence of Black B, White C, and Black D, thus choosing the actual game move.
Compared to the semifinals of the LG Cup, the one-line hane by Yang Dingxin that deceived Shin Jinseo and the AI in the life-and-death situation, the performance in this game is completely on a different level and his condition is worrying…
Phase 4 Move 115-160
Due to well-known reasons, there were some “changes” before the final of this LG Cup. People were not optimistic about whether Yang Dingxin could eventually win the championship. In the media interview before the game, he also frankly said: No matter who wins, the score will be 2-0. Up to this point in this game, Yang Dingxin
has to do his best to break his own prediction.
Ding Hao is also not clear about the prospect of managing the isolated group. Black 15’s jump attempts to find the crack in the white stones’ defense line. After placing the stone, he uneasily glances at the timer beside the board to check the time used. His heart becomes more and more irritated and he regrets more and more that he didn’t sacrifice the stones in the beginning.

Diagram 18
In Diagram 18, At the beginning of the white stones’ attack, Black 1’s invasion from the side is a flexible countermeasure. After the black stones sacrifice two stones, a large number of ko threats are left. Then making plans around the ko on the lower right will surely be handy.
Black 117 and 119 eventually have to return to the way of pursuing the flaws of the white stones. After a series of exchanges, the black stones form a relatively sufficient eye shape on the left.
However, when White 26 blocks, the black stones still can’t live unconditionally.
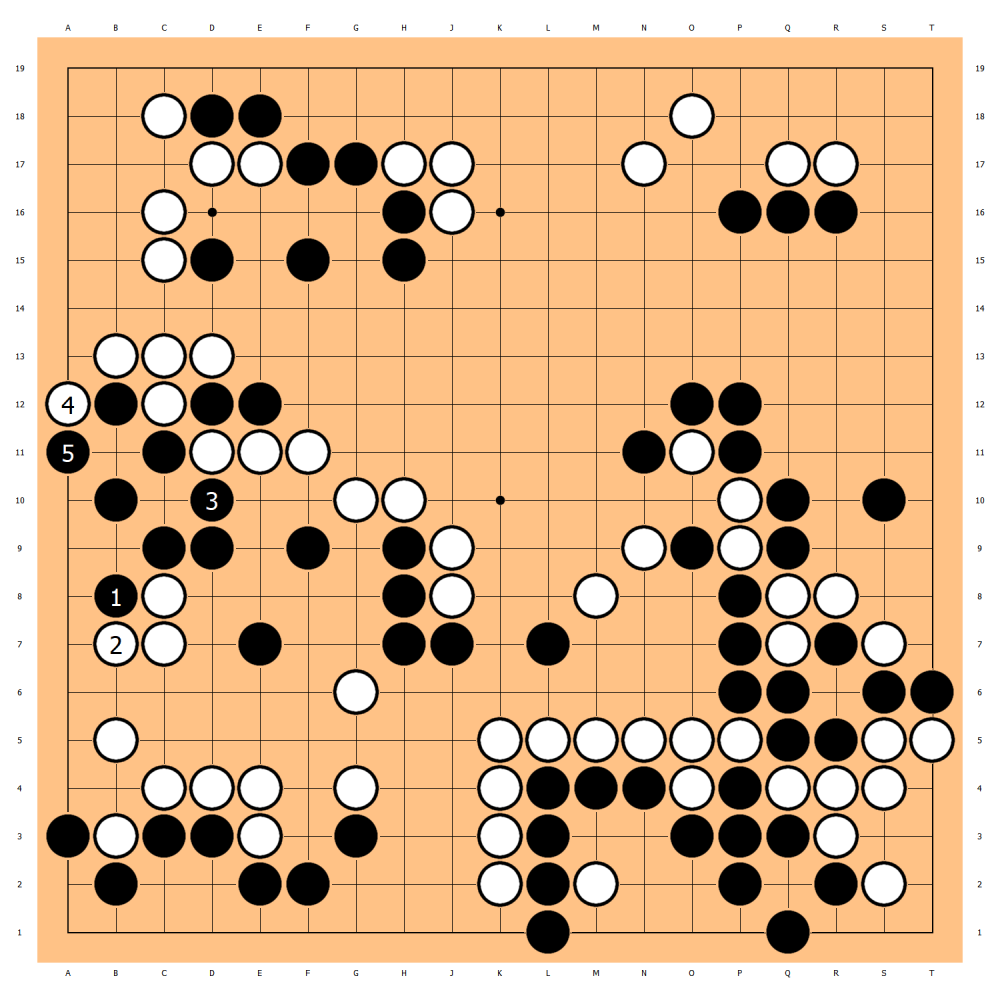
Diagram 19
In Diagram 19, Black 1, 3, and 5 create a ko. By using its own ko threats, it can live. The winning rate of the black pattern is 80%. But in actual play, it’s very difficult for the player to choose living by ko as the first option. A top player like Ding Hao will surely pursue a more effective way to manage the isolated group.
Finally, Black 127 “The move comes from the cut”. Once this move is made, it seems that the sound of the white stones’ defense line collapsing can be heard.
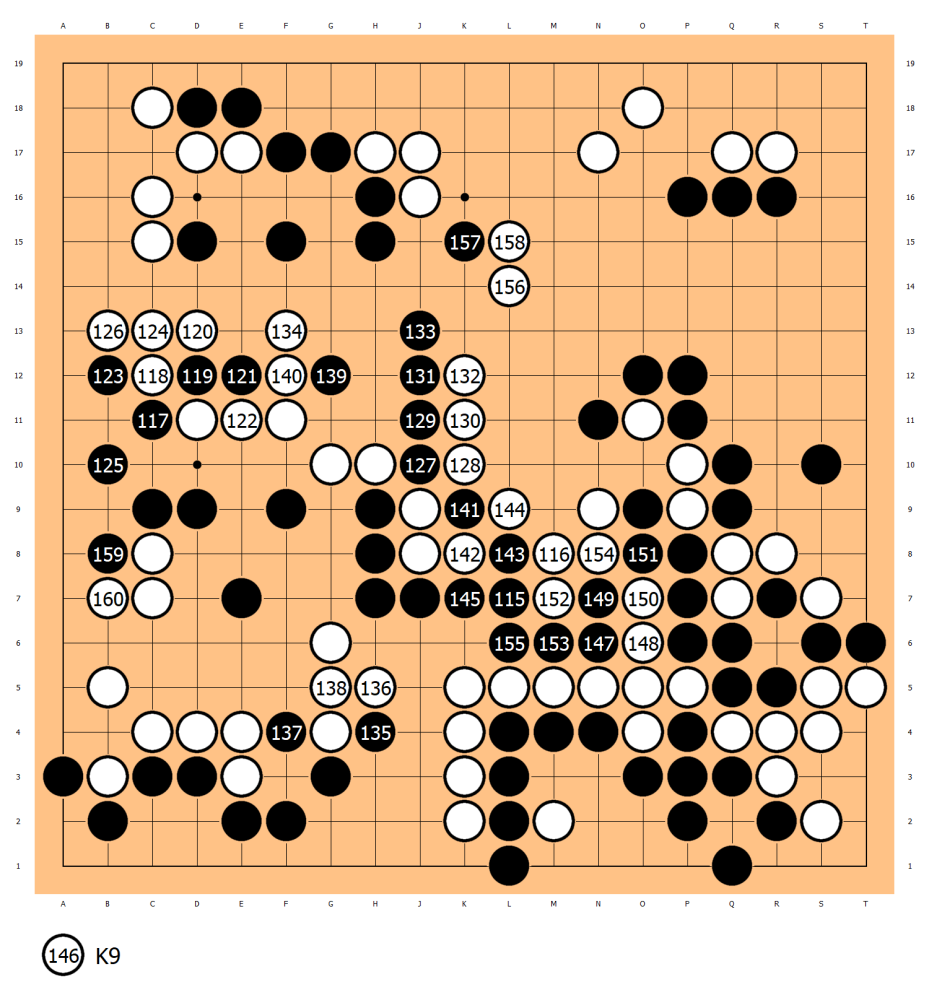
White 134 nets the two black stones. The black stones aim at the flaw of the white pattern in the center. Ding Hao thinks he has the winning ticket in hand and the LG Cup is within reach. It is driven by such an optimistic mindset that Black 141 soon makes a serious mistake.
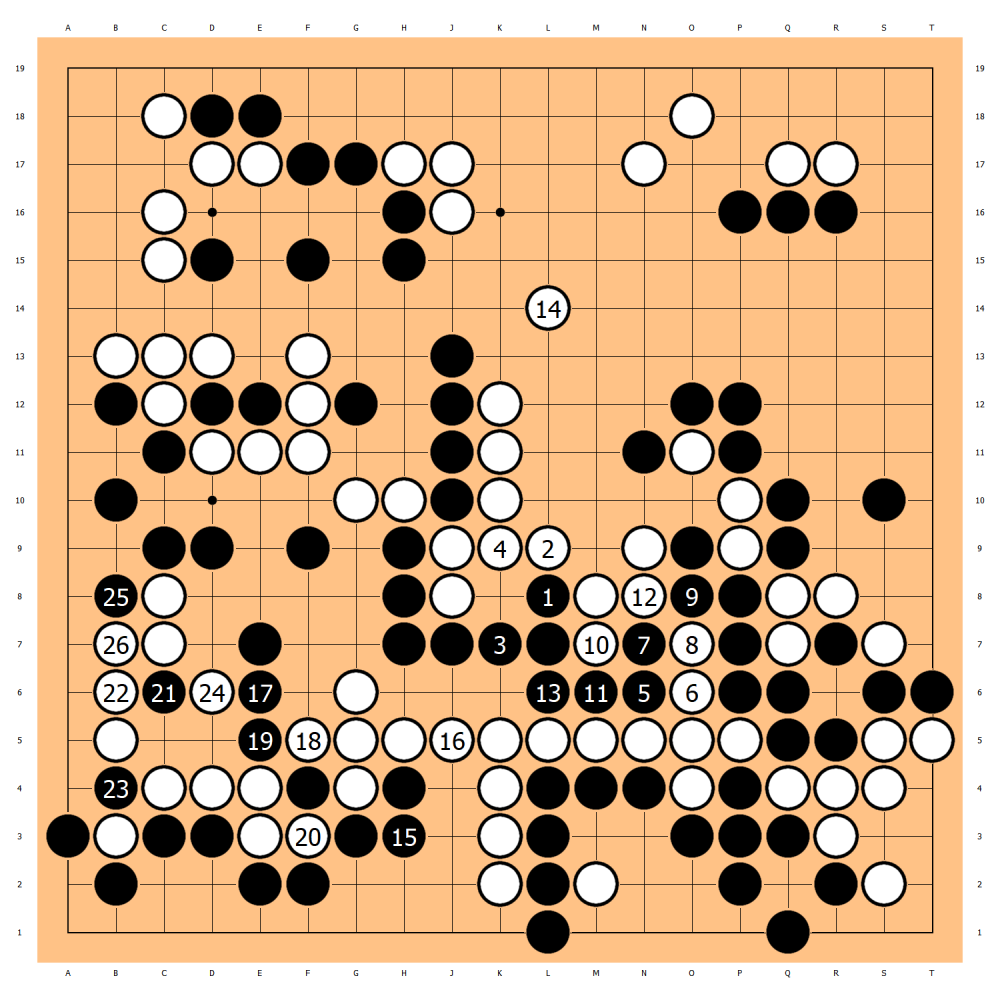
Diagram 20
In Diagram 20, cracks have appeared on the periphery of the white stones. Black only needs to simply push at position 1, exchange at position 3 to cut the white stones apart, and then connect at the bottom to establish the winning position. White 16 must first deal with the cutting threat. In the capturing race of the two large dragons, the liberties of the white stones are not advantageous. Even if it’s a seki, the white stones obviously fail.
In the actual game, Black 141 gives an extra stone. Ding Hao’s original intention was to make the group of white stones in the middle even tighter and more cramped. In fact, this liberty has no influence on the white stones at all. Next, Black 147’s attachment and cut, which was supposed to be the third severe move after Black’s extension and connection in the previous diagram, surprisingly has no killing power at all because of the strange self-tightening of liberties of the black stones earlier.
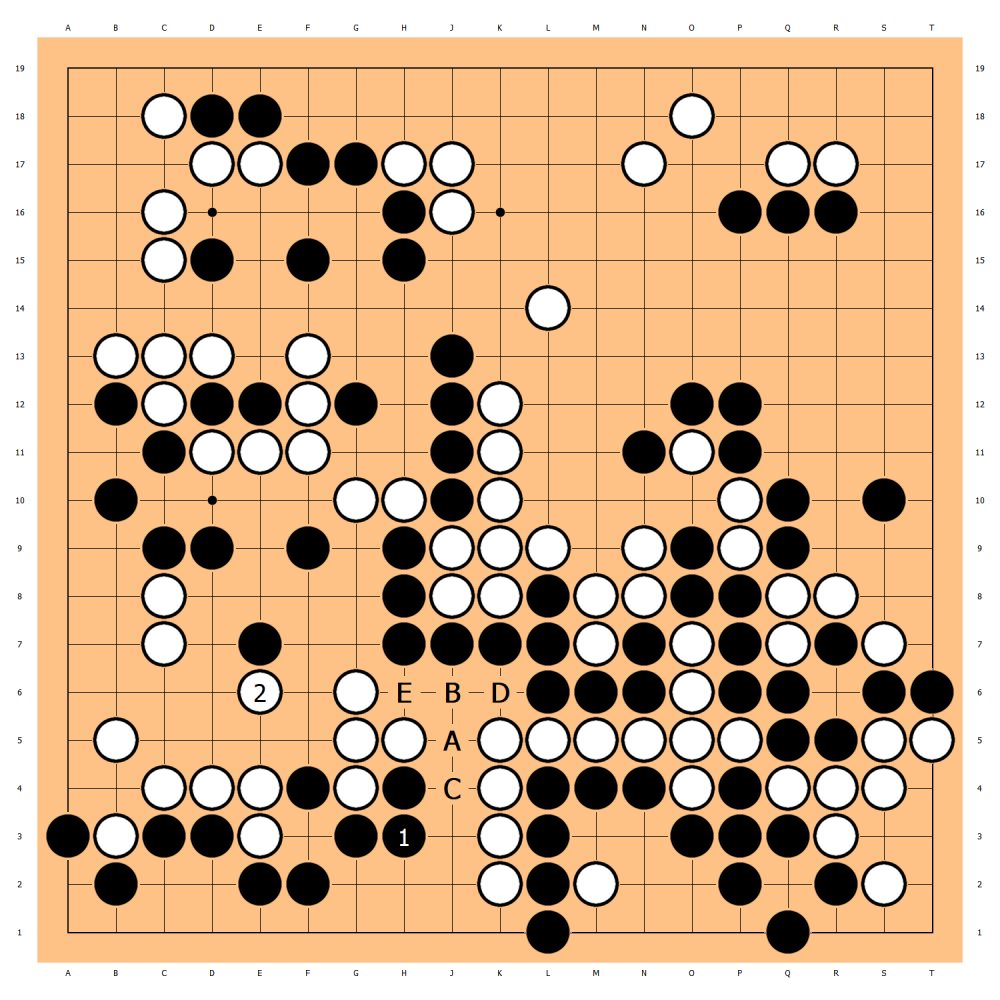
Diagram 21
In Diagram 21, when Black 1 connects at the bottom again, White 2 can tenuki and attach. The cutting method from Black A to E is no longer possible. By comparing these two diagrams, it can be found that the bad consequence brought by Black 41 tightening its own liberties.
After discovering his own low-level mistake, The winning opportunity slipped away in an instant, and the LG Cup became out of reach.
However, there are also factors favorable to Black now. Yang Dingxin spent too much time in the attack and defense in this area and only has 20 minutes left, while Black still has half an hour. The latter half of modern go battles is far more complicated than before. At the decisive moment, time is more important than the advantage of the number of stones.
Up to White 156’s knight’s move, the winning rate of the black stones is still in the leading position, but the situation is extremely chaotic. To put it bluntly, in such a wide-open pattern, a 90% winning rate and a 50% winning rate do not differ much.
After Black 159’s hane and White 160’s block, it’s a bit tangled on how to continue.
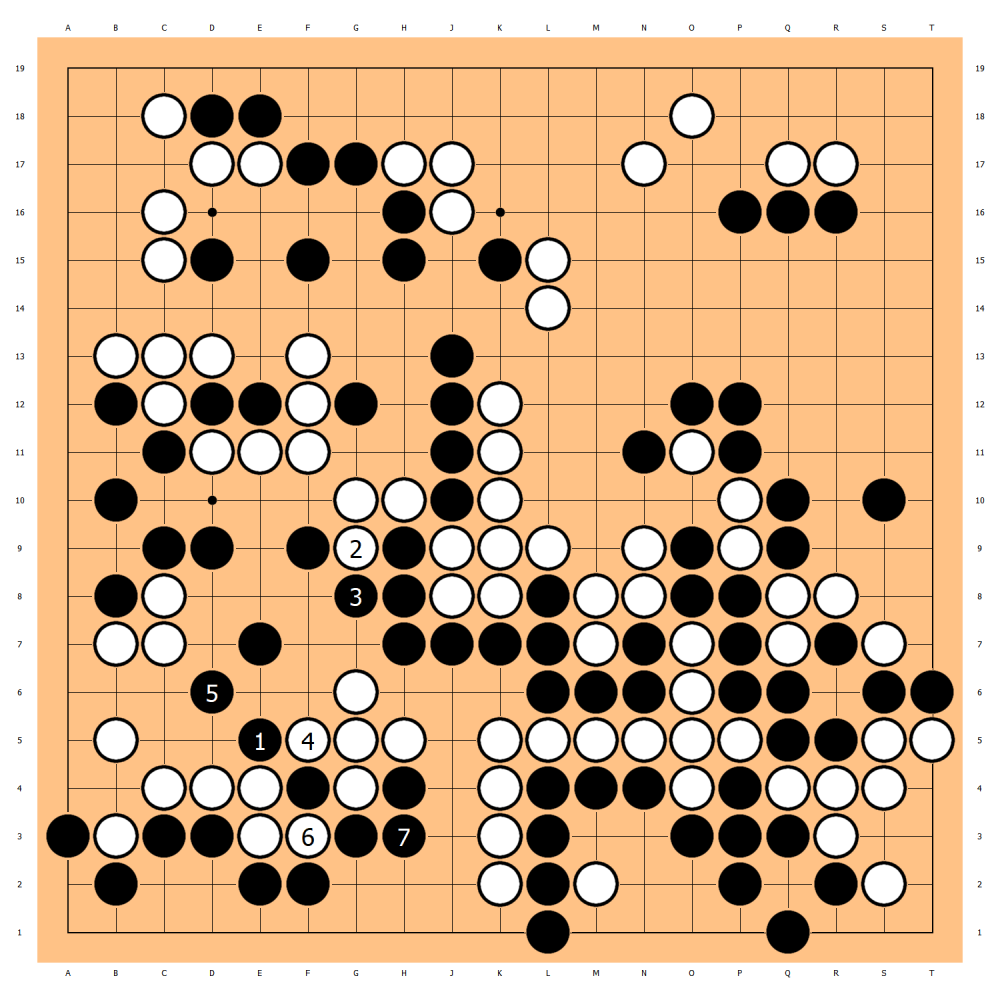
Diagram 22
In Diagram 22, Black 1’s hane will lead to an extremely complicated large-scale capturing race! The result given by the AI is that the winning rate of Black is close to 90%, theoretically it should be that White is in danger. For humans, it’s almost impossible to calculate the variations here clearly within the limited time and it’s also very difficult to make a decision.
After Black cuts off the white stones, making White’s capturing at position A a sente move is equivalent to losing one move on the right side. But because of his own mistake, the victory becomes distant. Often, one would be angry and choose the capturing race as shown in the diagram above. But after calm judgment, Ding Hao believes that after the black stones make life, the situation is still under control, so he has not made up his mind to carry out the capturing race.
Phase 5 Move 161-200
From Black 161 to 166, the sente attack on the connection of the white stones leaves methods such as the push at position A and the jump at position B. And White 164’s diagonal attachment also has a subtle influence on the black stones’ territory on the side. The ownership of the sente in the attack and defense at the bottom is very important.
After Black 171’s hane and 173’s push, White 174 can only connect. If it cuts and captures the two black stones, it will help the black stones sacrifice and make eyes, and at the same time, the white stones will also lose eye space.
After this, the black stones face a fork in the road of choice.

Diagram 23
In Diagram 23, Black 1’s capturing is the most fierce move, and it’s better in terms of territory compared to connecting at position 2. After Black 3 makes a group to form an eye, if both sides make life, Black will naturally succeed. But White 4 will surely create a ko. When White 28 throws in to create the ko threat, because Black looks for ko threats above and leaves the benefit of position 34 or 35. Even if Black gives up the six stones at the bottom, it’s still a big win.
It’s a pity that Ding Hao didn’t calculate the variations after capturing the two stones carefully and made the second mistake here. It wasn’t until White 176 connected that he realized something was wrong.
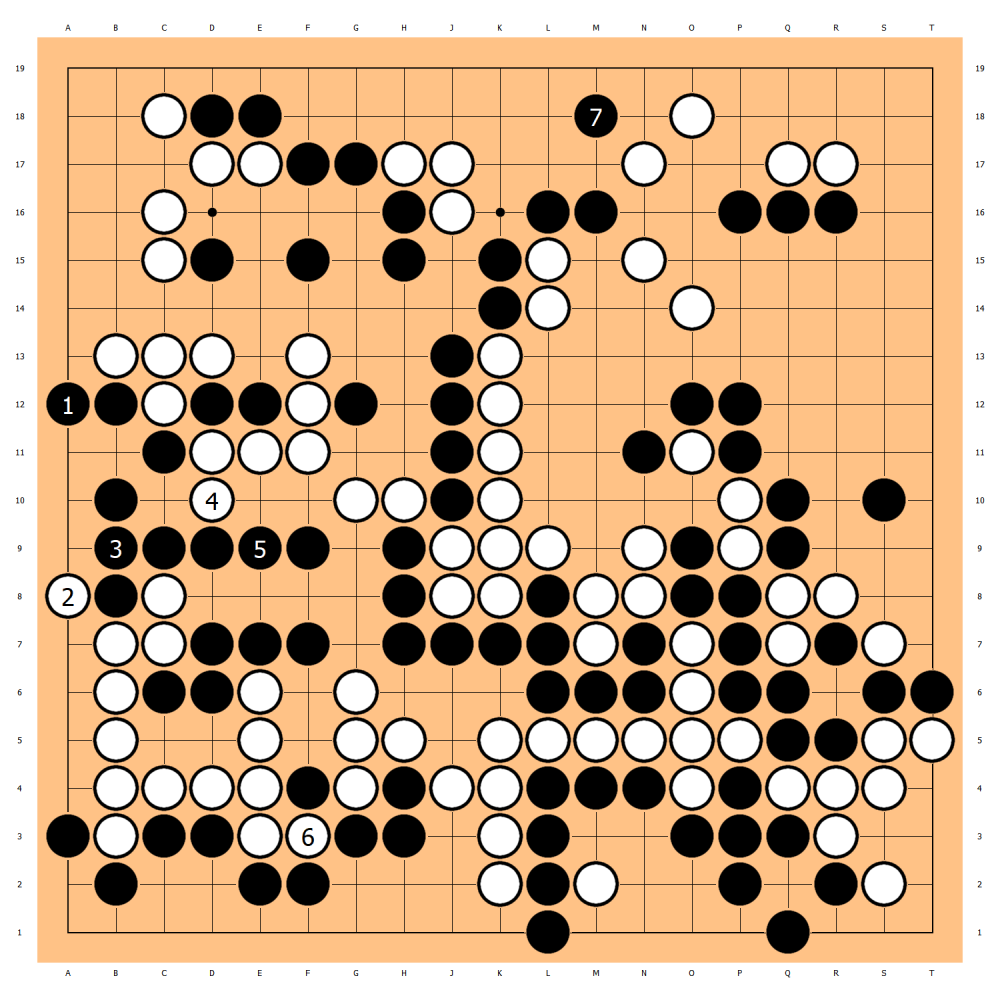
Diagram 24
In Diagram 24, he always thought that Black 1 could stand here to make life. In this way, the white stones at the bottom have only one eye and need to make life at position White 6 as gote. Black eats the three stones above and White loses badly.

Diagram 25
In Diagram 25, But when picking up the stone from the stone container, Ding Hao discovered that White has the excellent move of throwing in at position 4 and can tenuki to rescue the three stones.
Because there was no time for detailed calculation, Black 179 temporarily stood on the other side. It’s a bit better in terms of territory than the previous diagram and also hopes to confuse the white stones. Yang Dingxin has sharp eyes. White 180 captures first and 182 surely flies back the three stones. Because the black stones spent a lot of time “clearing mines” at the bottom, the time usage of both sides reversed. Black has only 6 minutes left and enters byo-yomi, while White still has 15 minutes. The double pressure of territory and time makes Ding Hao realize that the situation is somewhat out of control.
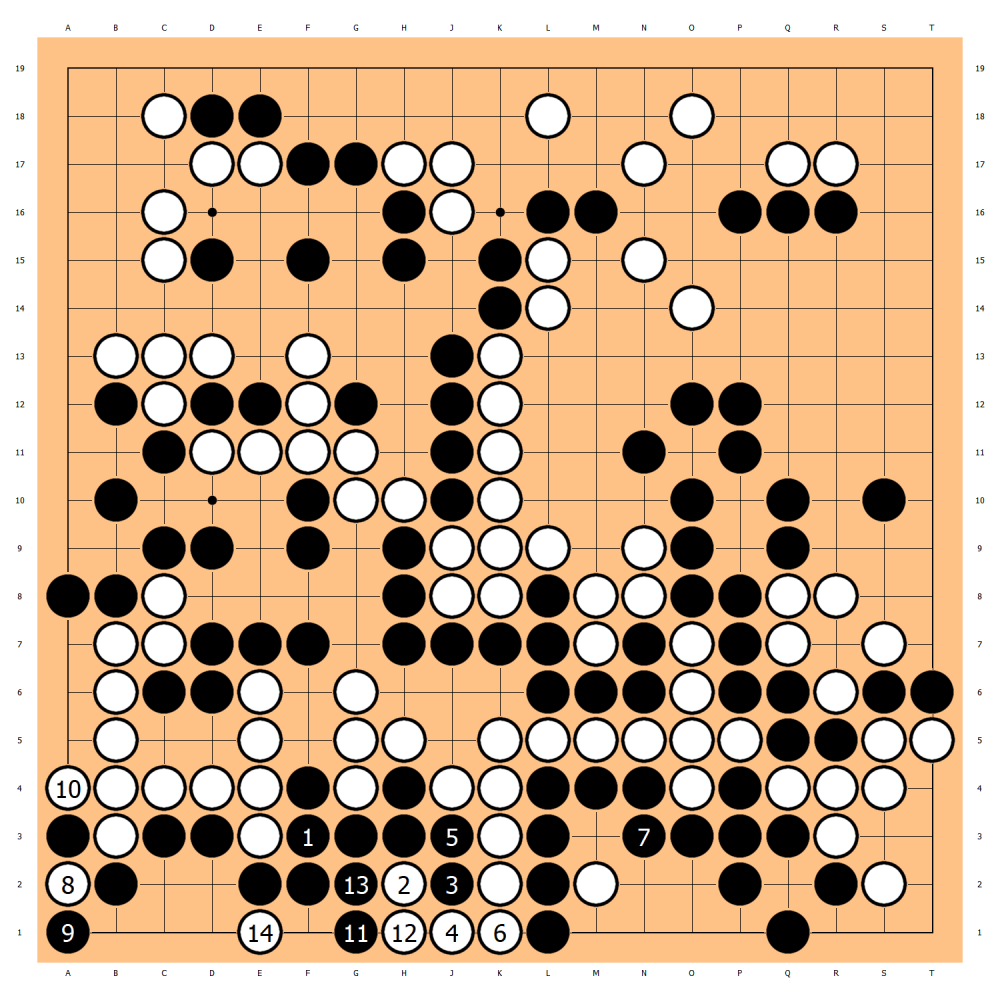
Diagram 26
In Diagram 26, Isn’t the white stones at the bottom not alive when Black connects? But the corner of Black 8 is also not clean and will form a strange ko.
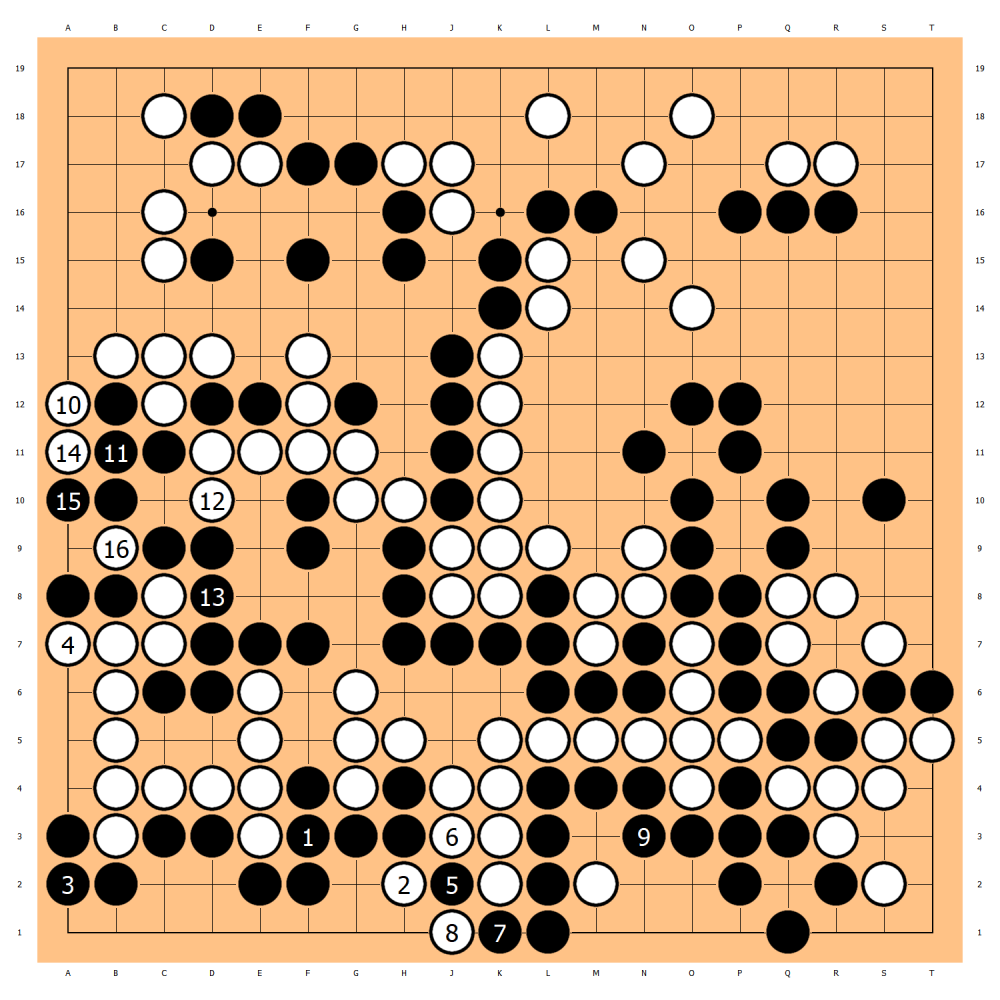
Diagram 27
In Diagram 27, if Black 3 wants to be tricky, White 4 makes an eye and it’s sente for the upper side. If Black ignores it, White has the killing sequence from 10 to 16. Combining with Diagram 25, it can be known that White has a “hidden eye” on the left.
Ding Hao, who is close to byo-yomi, judges that the situation is still slightly favorable. He actively “gives up the idea” and chooses Black 183’s bend. The winning rate of Black is 70% and there are nearly 10 points on the board. Nevertheless, the AI believes that even if Black accidentally forms Diagram 26, it’s still dangerous for White in the ko fight.
After Black 185 and White 186 each make up their moves, Black 187 takes the ko. A decisive point for victory or defeat appears on the right side again. White 188 jumps down to look for ko threats. Ding Hao enters byo-yomi. Black 89’s single diagonal move is slightly rough.

Diagram 28
In Diagram 28, the first feeling of the black stones is to bend and then diagonal. It can seize the sente to eliminate the ko on the lower right. Black has about 10 points on the board. In the actual game, Ding Hao is confident in winning the ko and believes that White will have to give up the ko sooner or later. Thus, bending here would instead become a crude move, so he gives up this diagram.
Phase 6 Move 201-249
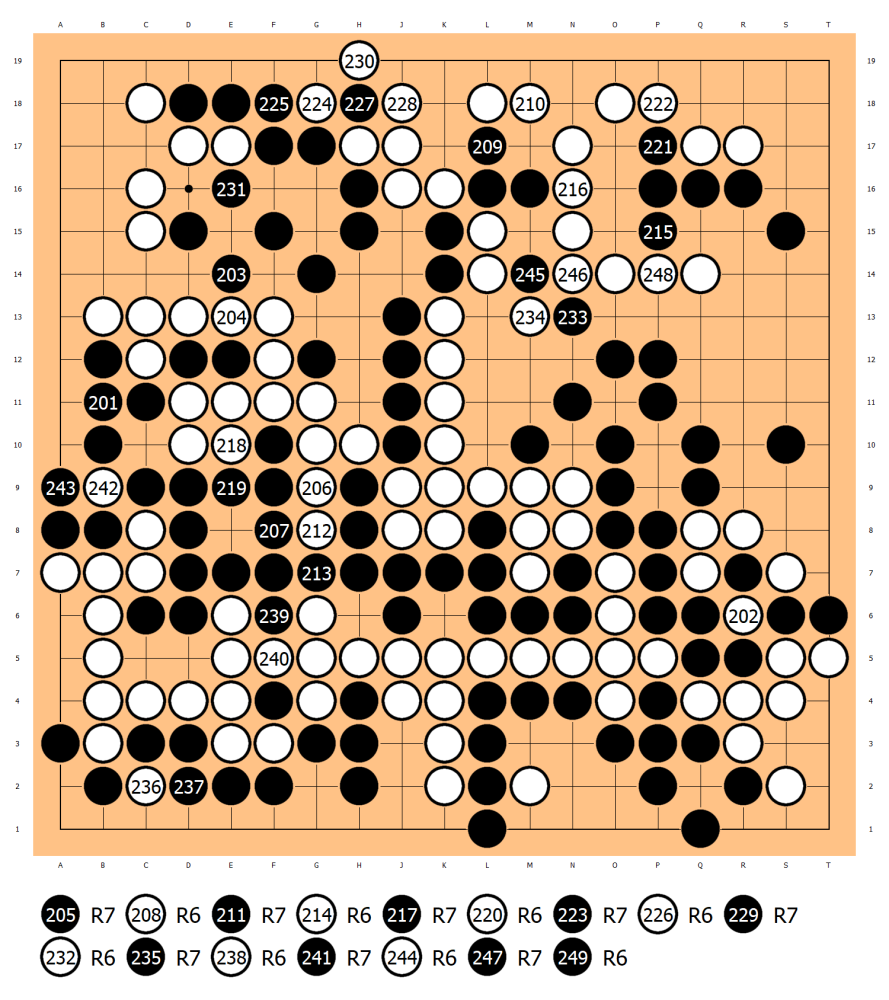
During the entanglement of the ko fight, Yang Dingxin also enters byo-yomi.
After several rounds of the ko fight, Ding Hao discovers that Black 15 still needs to look for ko threats on the upper side and can’t help regretting not bending earlier. Currently, although the black stones have a slight advantage in ko threats, both sides cannot be careless.

Diagram 29
In Diagram 29, From the perspective of the white stones, White 1 is not a ko threat. Black can eliminate the ko. The result of the exchange is that Black has more than 15 points on the board.

Diagram 30
In Diagram 30, From the perspective of the black stones, Black 1’s push and cut for exchange is not advisable. Black has only 5 to 6 points on the board and the winning rate is surpassed by the white stones.
Black 233 looks for ko threats. White 234’s diagonal and tiger shape is unexpected to Ding Hao.
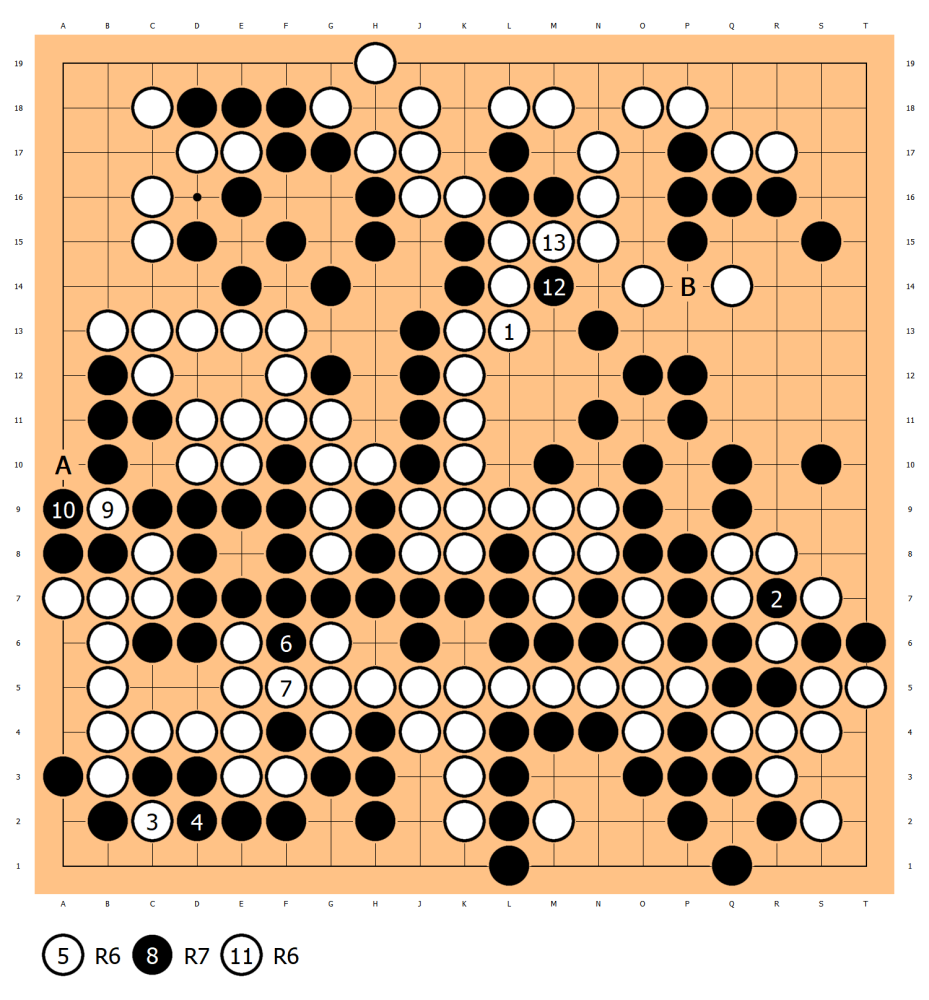
Diagram 31
In Diagram 31, In this local area, White usually connects. Black can at least find one ko threat without loss. White will be short of one ko threat. The interesting part of the current situation is that because the result of the exchange is subtle, the loss-making ko threat at position A for White cannot be easily used. This may make the exchange at position B for Black possible. However, the black stones also cannot easily look for loss-making ko threats elsewhere. Otherwise, the result of victory or defeat after White plays at B may also be reversed.
White 234’s strange move restrains the black stones’ ko threats. Ding Hao is confused in a panic and has no choice but to look for a loss-making ko threat at Black 245 to win the ko. In fact, during the ko fight, he has an illusion.
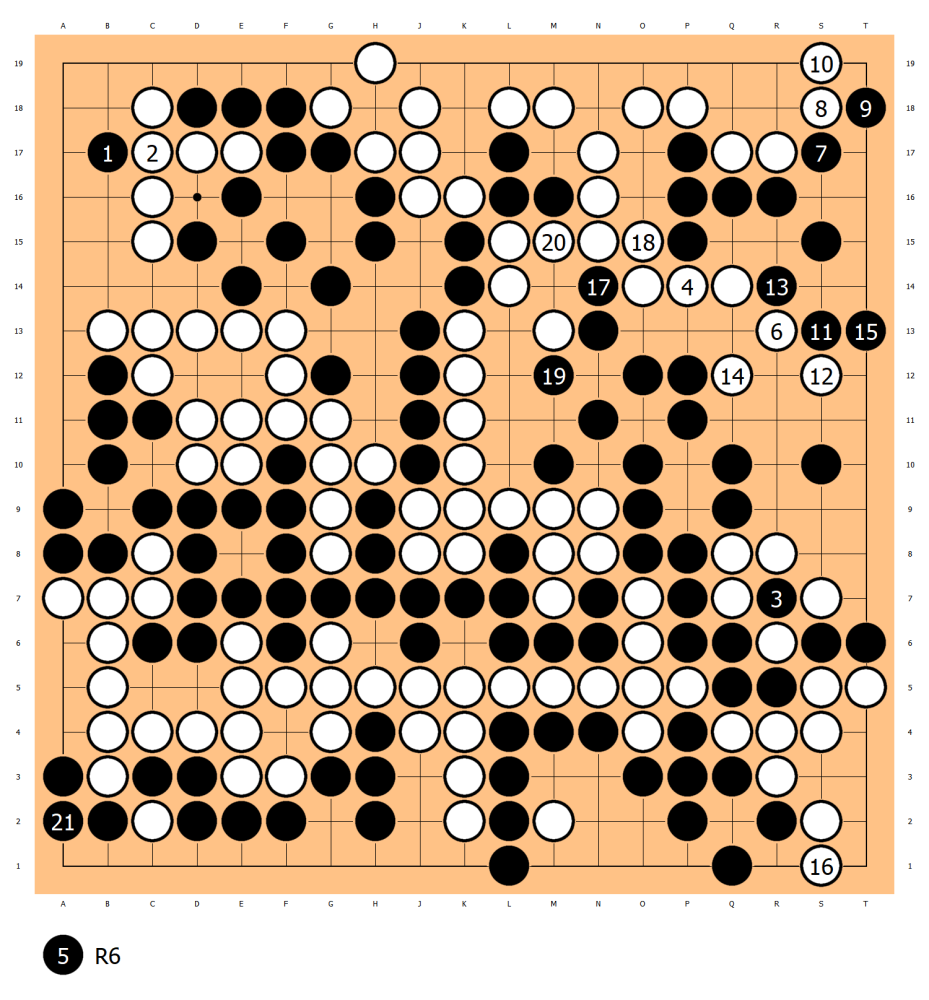
Diagram 32
In Diagram 32, Ding Hao ignores the excellent ko threat of Black 1’s point on the upper left. This move makes both the extension and connection on the left and right sides sente and does not lose points. Thus, Black will have one more ko threat to win the ko. White 4 breaks through the black stones’ territory for exchange. Up to 221, Black can win by about 1.5 points. Ding Hao’s illusion is very low-level. He mistakenly thinks that after the exchange of Black 1 and White 2, White also has ko threats on the black dragon. In fact, even if White plays two consecutive moves, it cannot threaten the life and death of the black stones.
Black 245 actually loses 2 points. These 2 points tip the balance of victory or defeat. Unconsciously, White met a heaven-sent opportunity.
Phase 7 Move 250-271
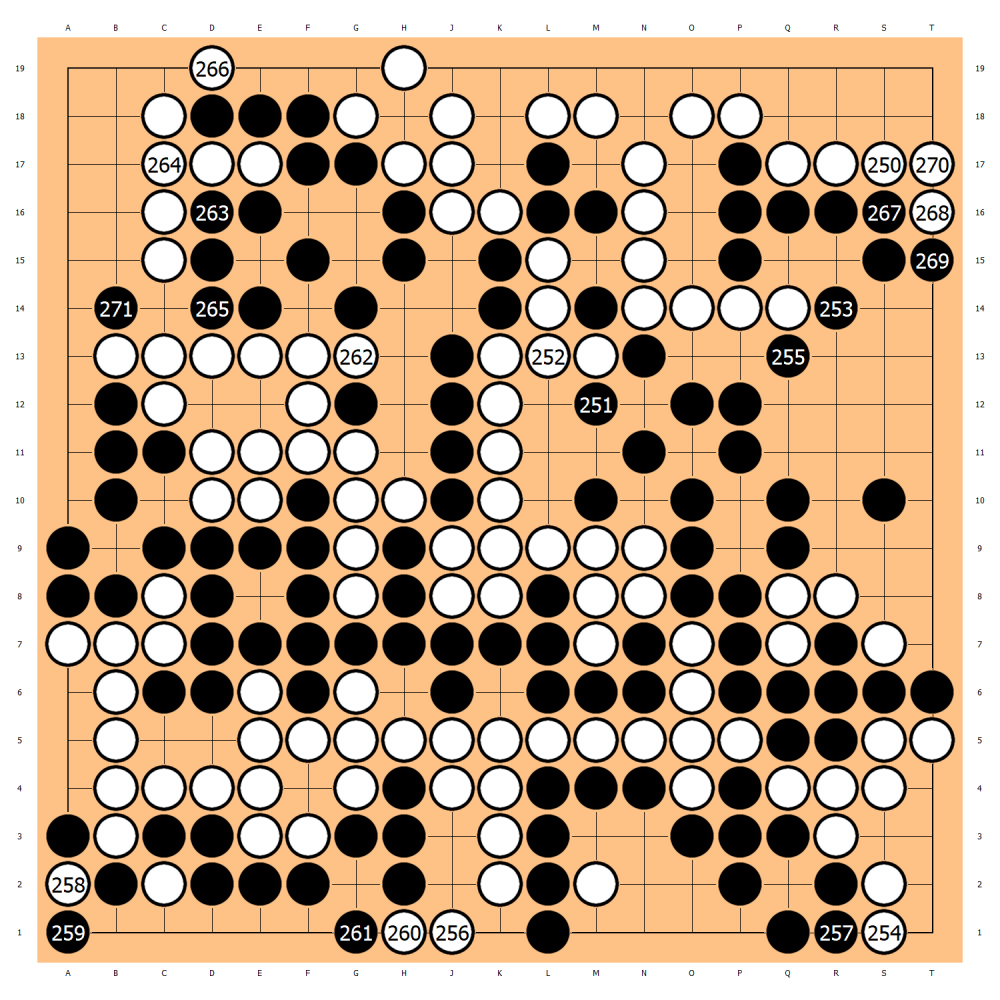
Diagram 33
In Diagram 33, White 1’s diagonal at the third line. After the sente shaping, there is a hope of making a living in the corner and winning by half a point. The △ move by Black loses at least 2 points, causing the winning rate to drop sharply from 93% to 43%. Although it’s not certain that White will definitely win in this diagram, this is indeed the first time that White takes the lead since the opening.
During the long ko fight, Yang Dingxin has no time to calculate carefully. Urged by byo-yomi, White 250 rejects the once-in-a-lifetime winning opportunity!
The following actual game is the consensus of both sides. At that time, Yang Dingxin didn’t figure out which is better between the actual game and the previous diagram. Ding Hao also didn’t see the opportunity for White in the previous diagram. Being able to escape is completely due to luck!
When Black 271 clamps, Ding Hao finally determines that he is going to win.

Diagram 34
In Diagram 34, If Black 1 habitually hanes, White 2 captures and Black loses. Black may have to fight for victory by capturing at position A and then throwing in at position B.
Phase 8 Move 272-320
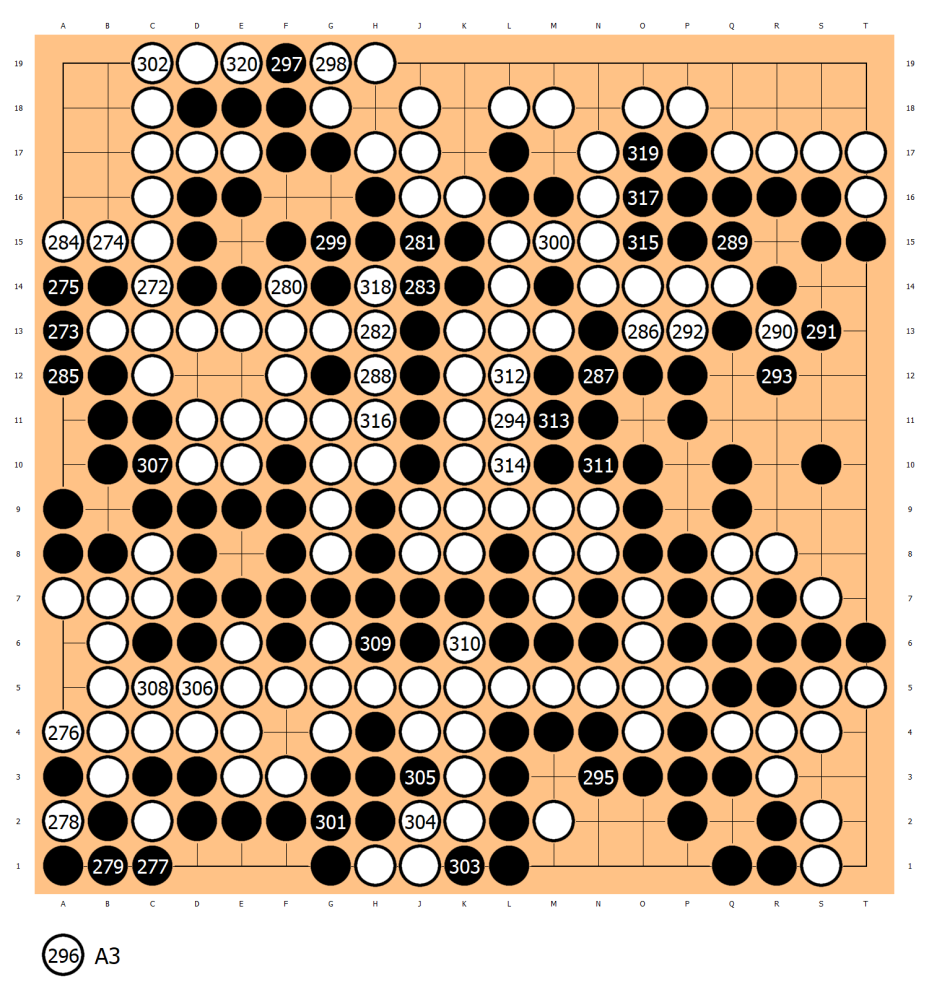
Near the finish line, Ding Hao experiences the terrifying moment in Diagram 33. Fortunately, it doesn’t arouse enough vigilance from the opponent and avoids the hidden reef.
Please note that Black can use the sente of capturing at position 320 on the upper side to throw in at position 298. By taking advantage of the ko threat advantage, Black can scrape more than 1 point from the white stones. Ding Hao judges that he has won. In the actual game, Black 295 allows White 296 to connect to the final single ko. Black 297 also gives up the method of throwing in at position 298 to fight the ko.
After that, they are all neutral points. Up to White 320, Black has 7 points on the board and wins by a narrow margin of even points. Ding Hao defeats Yang Dingxin with a total score of 2-0, winning his first world championship in his go career and achieving a breakthrough for Chinese players born after 2000 in international go tournaments!
320 moves in total. Black wins by half a point.